I love a good board game and always have ever since I was little. It does bring out my competitive side but that’s all part of the fun. As Anya is getting older, she is getting more and more in to board games and so we often spend an entire afternoon playing game after game. But she’s not the best loser but we’re working on this and hoping she will learn to try harder or at least be a better loser! Our latest obsession is this DIY game of checkers created by Marie-Laure of La Maison de Loulou especially for my readers.
I’m beginning to think that 5 is the magical age when kids start becoming very aware and start realising a lot more about the world at large. I guess it’s also got lots to do with starting school and expanding your horizons. I know Anya is definitely much more aware of things that go way beyond her immediate world. Yesterday she came home and asked me loads of questions about Valentines day. Up till last year she didn’t have a clue. So this Friday I thought I would do some fun crafts with her that didn’t require too many materials and most importantly ones that she can fully participate in. Shes a big fan of anything heart shapedso I’ve found 4 ‘sweet heart’ craftsthat look really nice but aren’t difficult. I’m going to let her choose her favourites but I might just nudge her towards making those pretty heart crayons as we have a ton of crayons that could do with a new lease of life.
1. Valentines heart glasses – you can print them out in any colour you like and make as many as you want. 2. Origami love hearts – cute little hearts to stick messages in or you could use them to decorate. 3. Valentines animal envelopes – from one of my favourite kids craft blogs, these cute envelopes are perfect to give little gifts, treats or notes to any special friends. 4. DIY heart crayons – they make a nice change from regular crayons or you could give them as little gifts in those animal envelopes.
As a kid, did you ever give out little cards to your friends on Valentines day? I did and it was just as fun to make the cards as it was to give them out. With Valentines day less than 3 weeks away, I thought you might like this sweet DIY love arrow kit that I came across. The kit contains everything you need to make 10 arrows with messages attached, the only extras you will use are scissors and glue. Kids around 6 and over will be able to do this craft all by themselves and when they’re done they can add a personal message to each arrow.
I’m so not in to the whole commercial side of Valentines day but I like the sentiment behind the day. Doing a special DIY craft with the kids is a simple and sweet way to mark the day and perhaps follow that with a special family meal at home. This love arrow kit is such a pretty DIY and a lot more unusual than giving out cards. You’ll find the kit at Clafoutis (a lovely little party shop) who made it in collaboration with La maison de Loulou where you’ll find lots more beautiful DIY’s.
Here are 4 fun and most importantly easy Christmas DIY projects that I found around the web. Those giant baubles are just the best!
1. Giant baubles: made from balloons, this is such a fun DIY and I can’t wait to try it. 2. Character cookies: a tasty looking treat and the kids can help decorate too. 3. Snowman ornament: a quirky take on a traditional snowman, perfect for kids to make and hang on your tree. 4. Elf ornaments: cute little tree hangers that can be stitched but for the easy option just print out the paper versions.
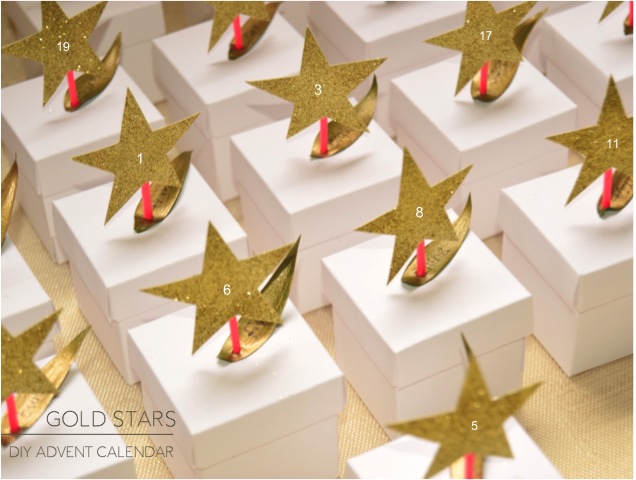
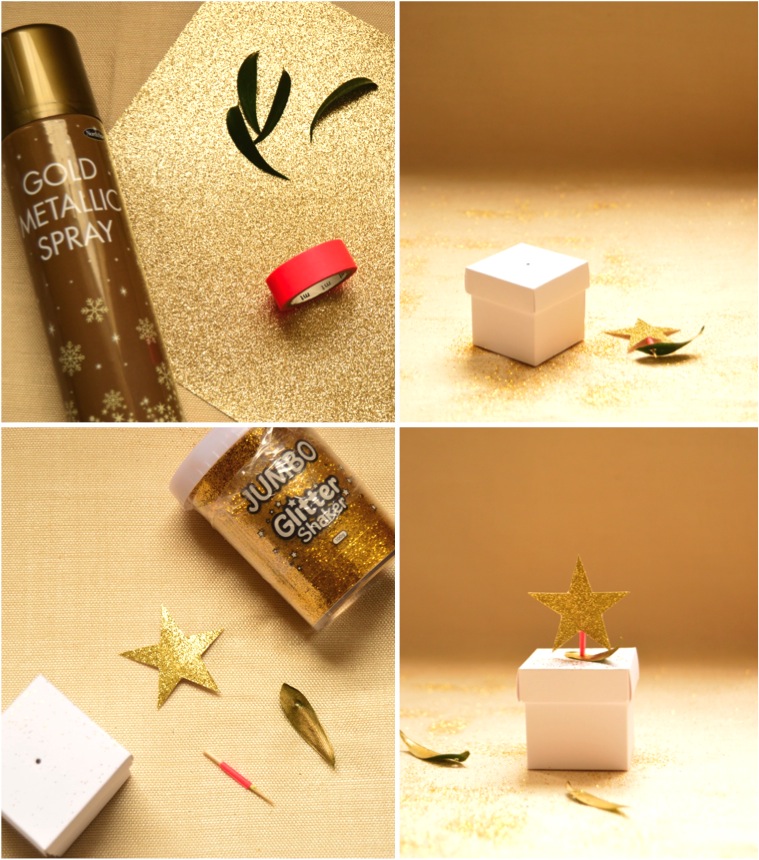
This year I really wanted to make an advent calendar for my daughter Anya. Being Indian, while growing up we didn’t really celebrate Christmas although we did occasionally get gifts. But we never had anything as fun and exciting as an advent calendar. So this year I decided to make Anya these little gold star topped boxes with a hint of neon pink. This DIY advent calendar was easy and fun to make. I used: mini white favour boxes, glittery gold card, cocktail sticks broken in half, washi tape, real leaves, gold spray, gold glitter and tape. I cut out 24 stars from gold card and stuck each star with tape on to half a cocktail stick that I had covered in neon pink washi tape. I also added an extra little detail of a gold leaf on each box. I took 24 tiny leaves from a bunch of flowers I had at home and sprayed them gold. At the moment I’ve numbered the stars graphically but I have little white number stickers and I’m going to let Anya do the stickering which will delight her no end! Alternatively, you could also put the numbers on the gold leaf. Finally, I sprinkled some glitter over all of the boxes to add a bit of extra sparkle.
Have you made an advent calendar this year? What did you make?
This is such a cute new idea or at least one I haven’t come across before. Karolina from Poland makes little DIY kits that allow you to make your babies first shoes. How sweet is that? And once your baby outgrows the shoes, you can keep them as a wonderful memory. These First Baby Shoe kitswould be such a fun and unusual present for any new parents or parents to be.
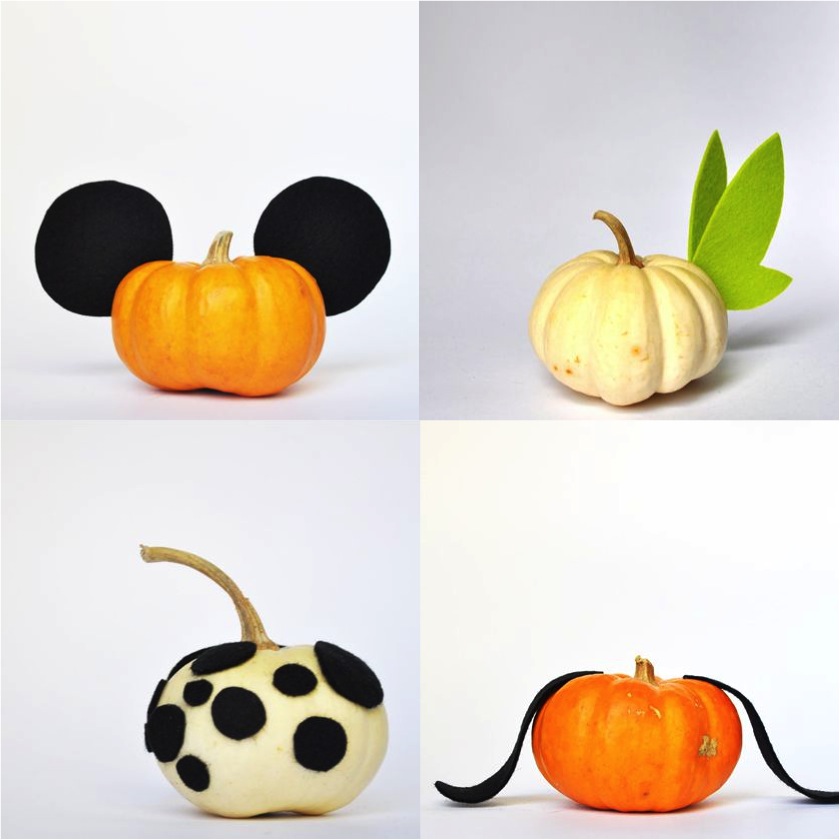
These party animal pumpkins are probably the coolest decorated pumpkins I’ve seen! These Disney inspired pumpkins are very easy to make but can you guess the characters?These bejeweled pumpkins would be great for adding a bit of bling to your Halloween table. These DIY donut pumpkins look good enough to eat, don’t you think?
The rain doesn’t seem to want to leave us alone here in London. My loud and repeated chanting of ‘rain, rain go away’ hasn’t done the trick. My 4 year old daughter is luckily a big fan of board games so we do spend time playing these on rainy days. But once you’ve played Snakes & Ladders 14 times in a row, it’s either time to scream or move on. The other rainy day activity that is always greeted with squeals of delight is crafting and DIY. So I went looking for a few fun and most importantly easy crafts and here’s what I liked:
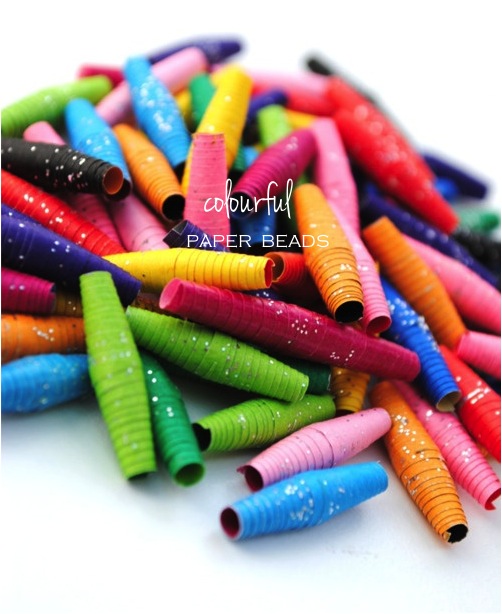
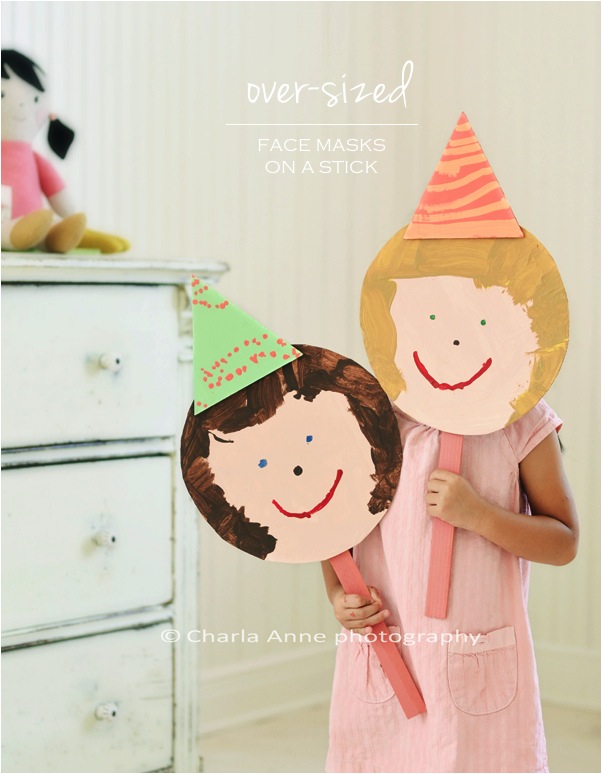
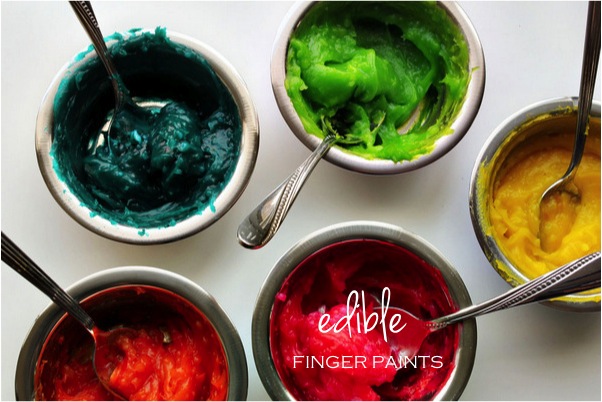
These DIY paper beads are easy to make and look so pretty too. The ones pictured are made of origami paper but you can use any paper you like. So really all you need is paper and a bit of glue. Once made, these can be threaded to make bracelets, necklaces or even a garland for your kids room.These over-sized face masks on a stick are so cute! Very easy to make and your child can get as creative as they like with the faces. Make hats or crowns, glue on straws for the hair or use glitter to add a bit of sparkle… the possibilities are endless. I love these DIY {edible} finger paints because not only can you make as many colours as you like, but this is one DIY that will entertain even babies. Since the paints are edible, babies and get as creative (and messy!) as they like without you needing to worry.
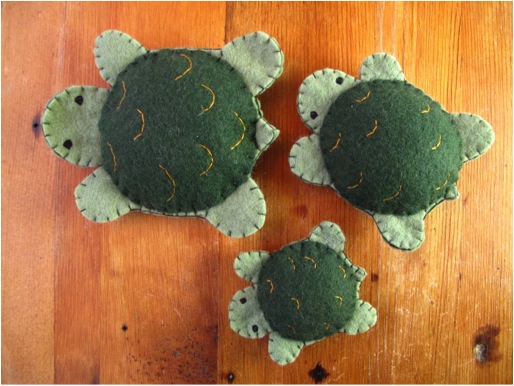
Half term is nearly upon us again! Is it just me or is this year zipping by? With half term coming, I thought it would be fun to share a DIY project and the lovely people at Kata Golda created one especially for my readers. You may have come across Kata Golda but in case you haven’t, they are seriously creative crafters. They have a shop full of handmade things which you can buy or if you’re a crafter yourself, they have some DIY books and colourful wool felt packs too.
Kata has a penchant for playing and creating with wool felt so we thought these adorable little turtles would be a cute project to share. Once made, these little creatures can of course be played with or displayed on a shelf but there is so much more you can do with them. They’d make a cute addition to a party bag, they can be used as place settings at a kids birthday or just to decorate the table. You could make a mobile with the 3 of them or a brooch with the littlest one… the possibilities are endless. Here are the instructions:
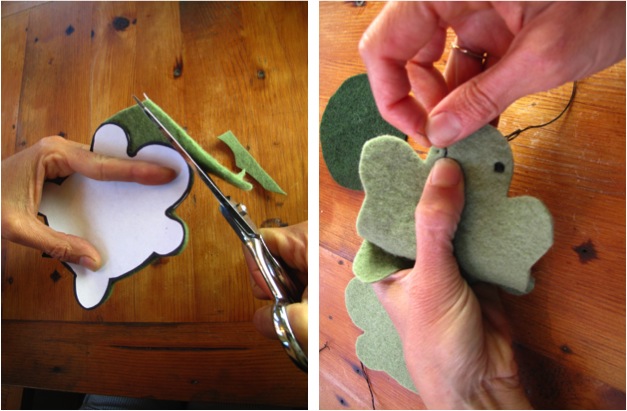
Print the template and cut out the template pieces with paper scissors. If you wish to make all three turtles, print one template at 100%, one at 75% and one at 125%. Then place the pieces on the felt and cut out the felt shapes with fabric scissors. Note that you will cut out 2 of the body pieces and 1 shell piece for each turtle you make. Stitch the eyes on one body piece using 3-ply black embroidery floss. Use a satin stitch and place the 2 eyes wide apart.
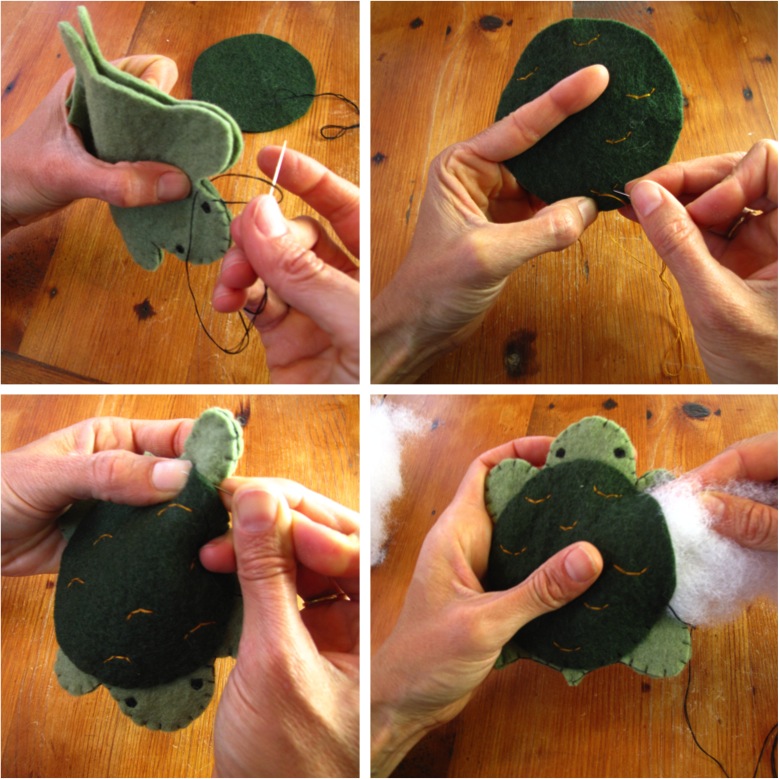
Using a blanket stitch and 2-ply black thread, stitch the 2 body pieces together. Next, use a double running stitch to sew eight “U” shapes on the shell layer with 2-ply gold embroidery floss. Now you need to attach the shell to the body. To do this, whip stitch the shell piece to only the top layer of the body three quarters of the way around. Leave an opening and stuff. Continue your stitch and close the hole. Repeat these steps for each additional turtle and you’re done.
Here are more details and all the templates you’ll need:
I saw these gorgeous floppy DIY sheep soft toys and I had to share them with you. If you are a knitter, how can you resist making them? I’ve come across these sheep before to buy but making them yourself is even better. You can choose your colours, the sizes and you can make as many as you want. I love the colours chosen here but the choice is yours. My mother-in-law is the knitter in this family so I’ll be asking her to make a few of these. I discovered these softies at Fawn & Forest but for full instructions visit Lebenslustiger.
Ebabee Likes is a style guide for babies, kids, teens and their mamas. It’s all about inspiration, ideas and indulging yourself and your brood. It’s written by me ~ Nomita ~ a style loving girl from Mumbai who now live’s in London. Read More...