Soup is so delicious at any time of the year and is such a great option for when you want to shift a few pounds (like I am trying to do at the moment). I can’t ever do diets that need separate meals to be made as realistically I’m not going to make myself a meal and then a separate one for my family. So soup is my answer. It’s a healthy and filling meal for all and everyone else can have some bread with it but I just stick to the soup.
I’ve recently become addicted to roasted cauliflower and have been experimenting with it so many ways. Last week I decided to try out a roasted cauliflower and garlic soup. I wanted to add a bit of a twist to the soup so I decided to add some smoked cheese to give it a subtle smoky flavour. Here’s my recipe: Continue Reading "Roasted cauliflower and garlic soup"
I love serving finger foods at parties because they are so practical and easy for everyone to eat from the little people to the grown-ups. But they are labour intensive as you have to make at least 2-3 bites of everything per person. So I often mix up the menu with food that I can cook in large quantities in one pot and one of my favourite one pot party dishes is risotto. It’s easy to make and then you can serve mini portions in lots of ways – my favourite way is to dish the risotto in to mini espresso cups. Today I’m sharing a delicious corn risotto that I serve to big kids and little ones at parties.
The blackened corn in this risotto comes from my childhood. Some foods evoke such vivid childhood memories that they literally transport you back to that time and place. One of those foods for me is blackened corn. The only way we ever ate corn in India was to roast it on a gas hob flame, rub it with butter and spices and eat. The smoky, charred flavour is so delicious and goes so well in a risotto. I like to sprinkle a bit of pancetta on top but this is optional – you can easily keep the dish vegetarian by using veg stock and omitting the pancetta.
BLACKENED CORN RISOTTO IN A CUP Makes: 15 mini servings
1 tbs olive oil 2 generous knobs of butter 350g Arborio rice 1 onion chopped finely 2 cloves garlic chopped finely 150ml white wine 1.3l chicken or veg stock 2 corn on the cobs parmesan cheese small pancetta cubes cooked till crisp (optional) small handful roughly chopped parsley salt & pepper to taste
I start with blackening my corn on the cob. Turn on the gas hob to a medium flame and hold the corn over the flame using tongs or similar. Keep turning the corn around so it blackens evenly and of course be careful! The corn will make a few popping sounds but that’s fine. Cut the corn kernels off the cob and keep aside.
Next make your risotto. You can use your favourite basic risotto recipe or follow the recipe here. Heat the olive oil and a knob of butter, once melted add your onions and garlic. Cook on a low heat till the onions soften but don’t colour. Add the arborio rice and stir well so that all the rice is coated in the butter. Pour in the wine and continue stirring till the wine evaporates.
Now add your hot stock (keep it hot on a low heat) one ladle at a time. Keep stirring until the stock is absorbed by the rice and then add the next ladleful. Once your rice is nearly done and you have around 2-3 ladlefuls of stock left to add, throw in your corn and stir well. Continue cooking with the remaining stock till the rice is al dente (soft and creamy with a slight bite).
Finally add another knob of butter and a generous amount of grated parmesan, taste and season accordingly – you may or may not need salt depending on how salty your stock is.
Now the fun bit – dish out in to little cupcake holders, espresso cups, small glasses or anything similar you have. The corn risotto not only tastes delicious but also looks great in little mini cups. Sprinkle the tops with the crispy pancetta (if using) and a handful of parsley. Dunk a teaspoon in each and serve.
It’s no secret that chicken soup is so good for you. So when the weather turns cooler I crave a dose of good, comforting, warming, homemade chicken soup. Nothing hits the spot quite like this simple dish. While I love a good old fashioned clear broth, my go to chicken soup is this Vietnamese one. Not only is it a full meal in a bowl but the subtle flavour of lemongrass adds such a delicious dimension to the soup. Add to that the coriander and dash of lime and you may have the best chicken soup ever. Once you try this Vietnamese chicken and rice soup recipe, you will be hooked. It’s easy enough to make for a mid-week meal which everybody will love, even the fussiest of kids (maybe minus the coriander!)
VIETNAMESE CHICKEN SOUP RECIPE Serves: 4
For the broth: 1 small chicken I medium onion peeled and quartered 2-3 cloves garlic peeled and crushed 2 inch piece of ginger sliced roughly 1 dried red chili (optional) 2 stalks lemon grass cut lengthwise and lightly bruised 2 tbs fish sauce
To finish the soup: 2 stalks lemongrass cut in to 3 pieces each and lightly bruised 110gms thai jasmine rice (or any rice you like) 1 tbs fish sauce 3-4 pak choi (optional) small handful coriander roughly chopped 1 lime cut in to wedges
Start by putting all the broth ingredients in to a large pot – as large as you have! Add 2.5 litres of water and bring to the boil. Let it boil for a couple of minutes. Turn the heat down to a low simmer, cover and leave to cook for 2 hours.
When cooked, skim the fat off the broth, remove the chicken and shred it. Strain the broth and set aside. I usually do up to this stage in advance like in the morning so I find the fat much easier to remove once the broth is cooled.
When you’re ready to eat, heat the broth and bring it to a boil. Turn down to a simmer, stir in the remaining lemongrass, fish sauce and the rice. Let it cook uncovered on a low heat till the rice is cooked – around 20-25 (but it really depends on your ratio of rice to broth). Once the rice is done, add as much of the shredded chicken in as you want (I usually keep some back for chicken sandwiches the next day!). Add your pak choi or other veg if using and once the veg has wilted a bit and the chicken is heated, it’s ready.
Spoon generously in to big bowls, top with lots of chopped coriander (may be not for the kids) and a good squeeze of lime and enjoy!
The subtle flavours of this Vietnamese chicken and rice soup are not only so comforting but they are also so refreshing. If food could give you a great, big hug, this would be the dish that does it for me. Whenever I mention that this soup is tonight’s dinner, everybody in my house is jumping up and down. And not just them – I’ve made it for friends too and they’ve all become addicted and taken the recipe. If I sound a bit crazy getting over excited about a bowl of soup, all I can say is that once you try it you’ll know exactly why!
P.S. If you like your Vietnamese food, you might enjoy this delicious Vietnamese grilled chicken dish too.
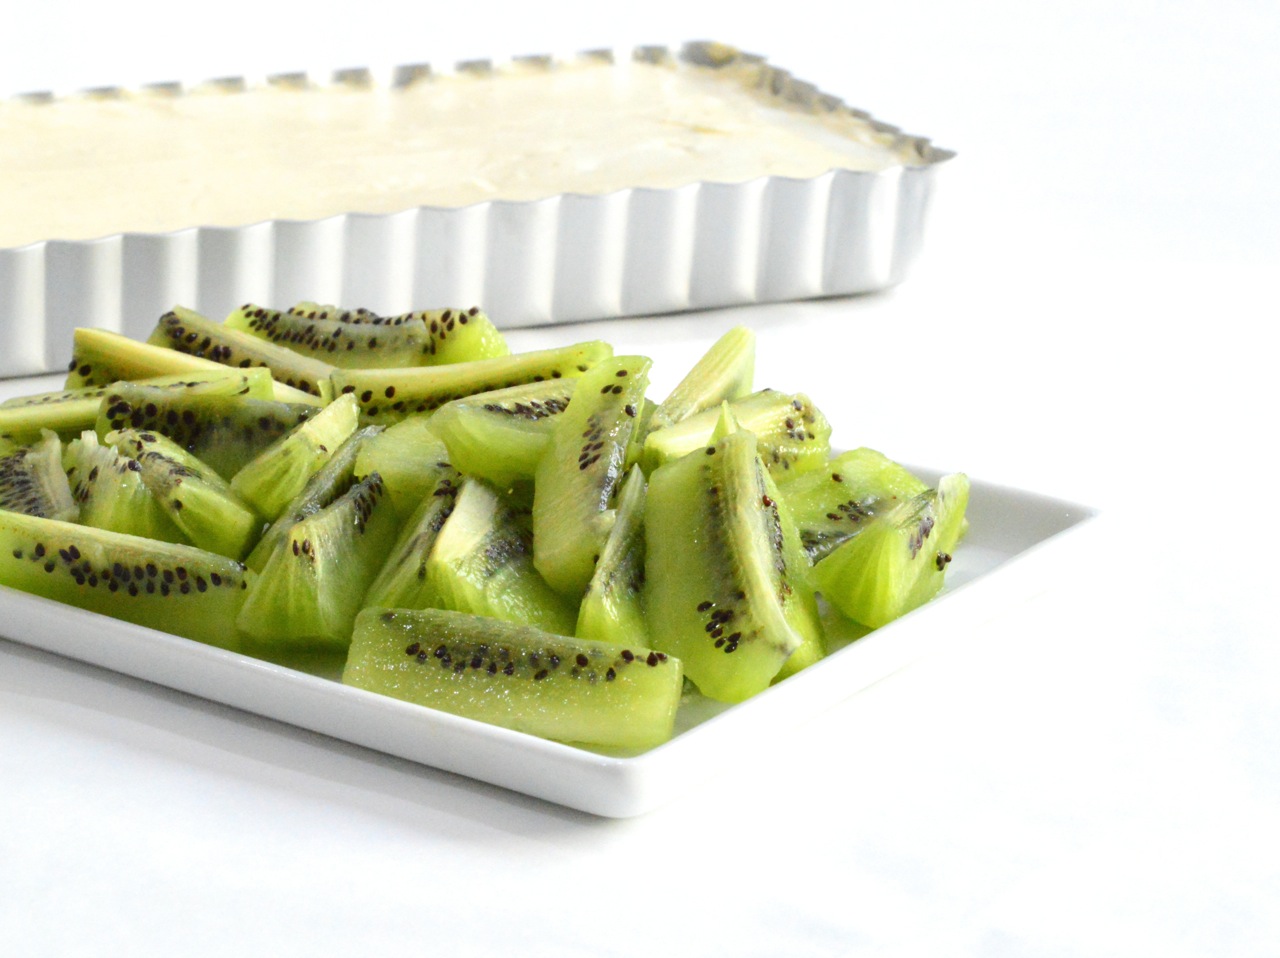
I love cooking but I’m not a fan of baking. When I have friends over I usually get so involved in the main savoury food that I end up buying a dessert or sometimes completely forget to get one at all. Recently I started thinking that I should try and up my dessert making skills but only easy-peasy stuff that still has the wow factor. And preferably no baking involved. So I decided to try a no-bake shortbread vanilla fruit tart and I can’t even begin to tell you how delicious it turned out. And the best part is that it’s so easy to make and you can just use the basic idea and get as creative as you want with toppings. Also it’s a great dessert to get kids involved in too – it’s that simple.
This fruity dessert is a beautiful cross between vanilla cheesecake and a fruit tart but instead of traditional digestive biscuits as a base or a normal fruit tart base, I decided to try shortbread biscuits and it worked so well. The shortbread biscuit base has just the right amount of crunch and sweetness without needing to add more sugar to it.
SHORTBREAD VANILLA FRUIT TART Serves: 8-10
340 gms shortbread biscuits 100 gms butter melted 3 tubs philadelphia cream cheese (180gms x 3) 100 gms icing sugar 300ml double cream ½ vanilla pod seeds 2 tsp vanilla extract 7 kiwi fruits
Start by putting the shortbread biscuits in to a freezer bag or similar and crush them to a fine crumb with a rolling pin. Add the melted butter to the biscuit crumbs and mix really well. Spoon this mixture in to your tart tin and flatten with a spoon making as even as possible.
Note: I used a rectangular tart tin (35 x 12 cms) for extra wow factor but Anya also made four individual ones in mini round tart tins (9cms diameter). So the quantities above are for making more than a rectangular tart but you can reduce slightly to make just one big tart.
Place the biscuit bases in the tins in the fridge so they can harden and set – leave for at least an hour. While they’re chilling, tip the cream cheese, icing sugar, vanilla pod seeds and extract in to a bowl and mix well. Next add the double cream and fold it in till it’s completely mixed in. Get the bases out of the fridge and spoon the cream cheese mixture on to them. Smooth it out with a palette knife if you have one otherwise just a regular ol’ knife is good enough – it’s what I used.
Let the tarts chill and set in the fridge for 2-3 hours. You can do all this even 5-6 hours in advance. When you are ready to serve, chop your fruit – you can choose any fruit you like or even a few different ones. Top your tarts, serve and enjoy!
This vanilla fruit tart with cream cheese and shortbread is so delicious. And it has such a wow factor too but yet it’s so easy to make. It is quite rich so a little goes a long way. For the fruit toppings, you can use any fruit you like or even a combination of 3-4 fruits. I love the slight sharpness that the kiwi fruits gave to this dessert but berries, mangoes, peaches, plums or any fruit you can think of will work just as well.
Do you get stuck in a food rut? Making the same old tried and tested recipes week in and week out? As much as you may love those foods, it gets boring to eat the same food every week. I have recently found myself being caught in this trap and decided it was time to try one new recipe a week. Nothing too complicated as time is always short during weekdays and also any new recipe has to be family friendly too. So when I came across this Taiwanese minced pork recipe that sounded interesting, I decided to give it a go. It turned out to be yummy with bags of flavour and has already become a regular in our mid-week menu. And it also freezes really well so I usually make two meals worth which is what I’ve given you quantities for below.
TAIWANESE MINCED PORK AND RICE Serves: 8
900 gms minced pork 1-1½ tbs sunflower or vegetable oil 2 garlic cloves minced 2 star anise 2 bay leaves (dried is fine) 1 tsp freshly ground black pepper 3 teaspoons sugar 1 tsp Chinese five spice powder 4-5 tbs cooking wine 2 tbs dark soy sauce 4-5 tbs regular soy sauce 600ml chicken stock (shop bought is fine) 80gms fried shallots and a bit extra for garnishing* 3 spring onions finely sliced One fried egg per person
*For the fried shallots, the easiest option is to get them ready fried from an Asian supermarket. If not then finely slice and deep fry the shallots till they are crispy.
Start by heating the oil over a medium heat. Add the garlic and quickly stir for about a minute making sure it doesn’t burn. Add in the minced pork and turn the heat to high. Cook the pork, stirring and breaking up any large bits until all the meat is browned.
Now add the sugar, pepper, five spice, star anise and bay leaves to the minced pork and give it a very good mix. Next add the cooking wine and bring to a boil. Let the wine bubble for a couple of minutes and then add both the soy sauces and the chicken stock. Bring back to the boil, reduce the heat to a low simmer and cover and leave to cook for 30 minutes.
After 30 minutes add in the shallots and stir everything really well. Then cover and leave to cook for another hour – stirring occasionally. Once the sauce has thickened and the pork has become really soft, it’s done.
When you’re ready to eat, fry the eggs – one per person. Pile up a bowl with rice and top with the pork. The pork is very flavourful so a little goes a long way. Place the fried egg on top and I like to add some steamed green beans to the dish as this then makes a complete meal – but you can add any veg you have in the fridge. Serve the dish with the chopped spring onions and fried shallots for everyone to use as a garnish.
This Taiwanese minced pork dish doesn’t only freeze really well but you can also make the pork several hours in advance and just heat when you’re ready to eat so it makes a great prepare in advance dish for when you have friends over too. And once all piled up in a bowl it tastes delicious and looks so pretty too.
I got the idea for this dish while googling recipes with minced pork. There were two recipes that stood out for me and so I kind of created my own version using these two recipes as a guide: 1 and 2.
Eating fresh and healthy food as a family doesn’t have to mean boring. We love oriental style meals in this house as they always offers lots of flavour and often without too much effort. Home cooked oriental food is always better and so much healthier than a take-away. One of my favourites is this Vietnamese street food inspired dish of grilled chicken with rice and pickled veggies. The Vietnamese version almost always uses pork and noodles but I use chicken for a healthier option and I think rice works better than noodles in this dish so rice it is. I also use different herbs and spices than the traditional so you could say this is my take on a Vietnamese classic.
Once you try this dish, I promise you will never look back. How can ingredients like the ones pictured above be anything but flavourful? The grilled chicken in the dish is just delicious and all the other flavours come together to make for an absolutely beautiful bowl of food. What’s more this dish is versatile and can be adapted for different tastes within a family – if you want to go low carb, leave out the rice and have it on a bed of salad or if you’re eating really healthy use brown rice. Also the toppings are all optional so everybody can choose what they want on their dish. The dish takes a little effort to prep but you can strip it down for a quicker meal or go the whole hog when you have a bit more time. Like the pickled veg for instance – you can serve it with just freshly sliced veg instead of pickling when time is short.
VIETNAMESE GRILLED CHICKEN AND RICE RECIPE
Serves: 4
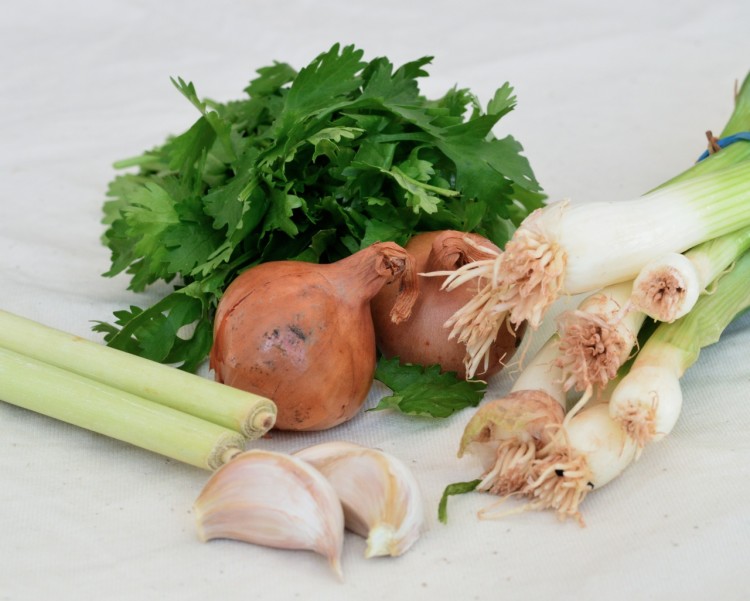
For the marinade: 700gms boneless & skinless chicken thighs 2-3 shallots very finely chopped 3 garlic cloves minced (add more or less depending on taste) 2 stalks fresh lemon grass lightly bruised and very finely chopped 50gms granulated sugar 2 tbs fish sauce 1.5 tbs dark soy sauce (the dark soy is important as it’s a lot thicker than usual soy) 1.5 tbs sesame oil generous amount of freshly ground pepper
Toppings: 2-3 tbs toasted sesame seeds handful of chopped coriander 3-4 thinly sliced spring onions (topped with 2 tbs hot olive oil and a pinch of salt and sugar) 1-2 sliced red chilies (optional)
Pickled veg: 2 x 3 inch piece of cucumber cut in to matchsticks 2 x 3 inch piece of carrot cut in to matchsticks 250ml warm water 40ml white vinegar (add more if you like a sharper taste) 1 tbs sugar ½ tsp salt
200-250gms basmati rice cooked as per packet instructions
Start by marinating the chicken thighs. Just trim any big pieces excess fat but leave a little on as you don’t want the chicken to dry out when it’s cooked. Cut in to large-ish bite size pieces. Mix all the marinade ingredients together in a large bowl and add the chicken to this. Give it a very good mix and leave to marinate for at least 1.5-2 hours or longer.
For the picked veg, take a jar and combine the warm water, vinegar, sugar and salt stirring till the sugar is dissolved. Add the matchstick veg and leave to pickle. Even an hour or two will do for light pickling. I don’t like a sharp taste (I prefer a bit more sweetness) so I put very little vinegar but you can adjust quantities to your own taste. The best way to find the perfect quantities for you is to taste the pickling liquid before you put the veg in so you know exactly how sharp/sweet/salty it is.
Chop and prepare all the toppings if you haven’t done so yet. For the sesame seeds toast them lightly in a dry frying pan over a moderate heat. Move them around with a wooden spoon to make sure they toast evenly. Keep an eye on the seeds as once they start browning they can burn very easily. Once they’re lightly browned, take them off the heat and out of the frying pan immediately otherwise they will continue to cook.
That’s all the prep done! When you’re ready to eat cook the rice and place the chicken under a hot grill. You can also skewer the chicken and cook over a barbecue. It’s even more delicious but a grill works well too. Turn the chicken once – around halfway through cooking. The chicken will take around 10-15 minutes to cook and will come out all dark and beautifully caramelised. Scoop some rice in to a bowl, top with the chicken and the pickled veg. Then generously scatter some sesame seeds, coriander, spring onions and chilies (if using) and eat!
This Vietnamese grilled chicken and rice recipe is one of my favourite mid-week family dinners and it’s also a very tasty one dish meal to serve when you have a few friends over as it appeals to adults and kids. What’s more, kids love being given all the bits of the dish and building their own. Try it and you won’t regret it!
We are huge foodies in this house. We LOVE to eat! And we love to cook. If you’ve been following this blog you’ll know that we were doing a huge house renovation project which meant we haven’t had a kitchen for six months! But we do now and we’ve haven’t stopped cooking since. I am all for experiencing and eating different foods, foods from around the world but also food that is family friendly. In the past, I’ve often ended up cooking two meals in an evening – one for Anya and one for Richard and me. That just takes the joy out of cooking and it starts to feel like a chore. So I keep looking for new ideas and flavours that will feed us all and I thought I would share some of my favourties here too.
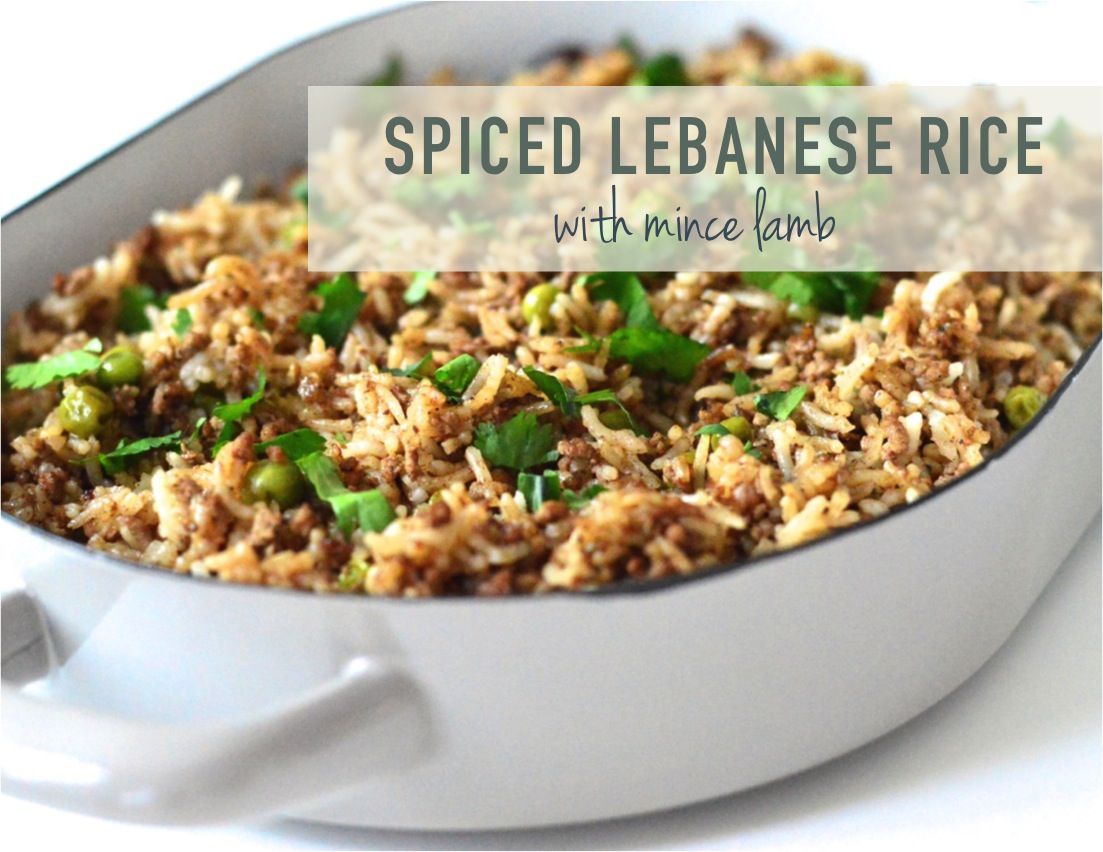
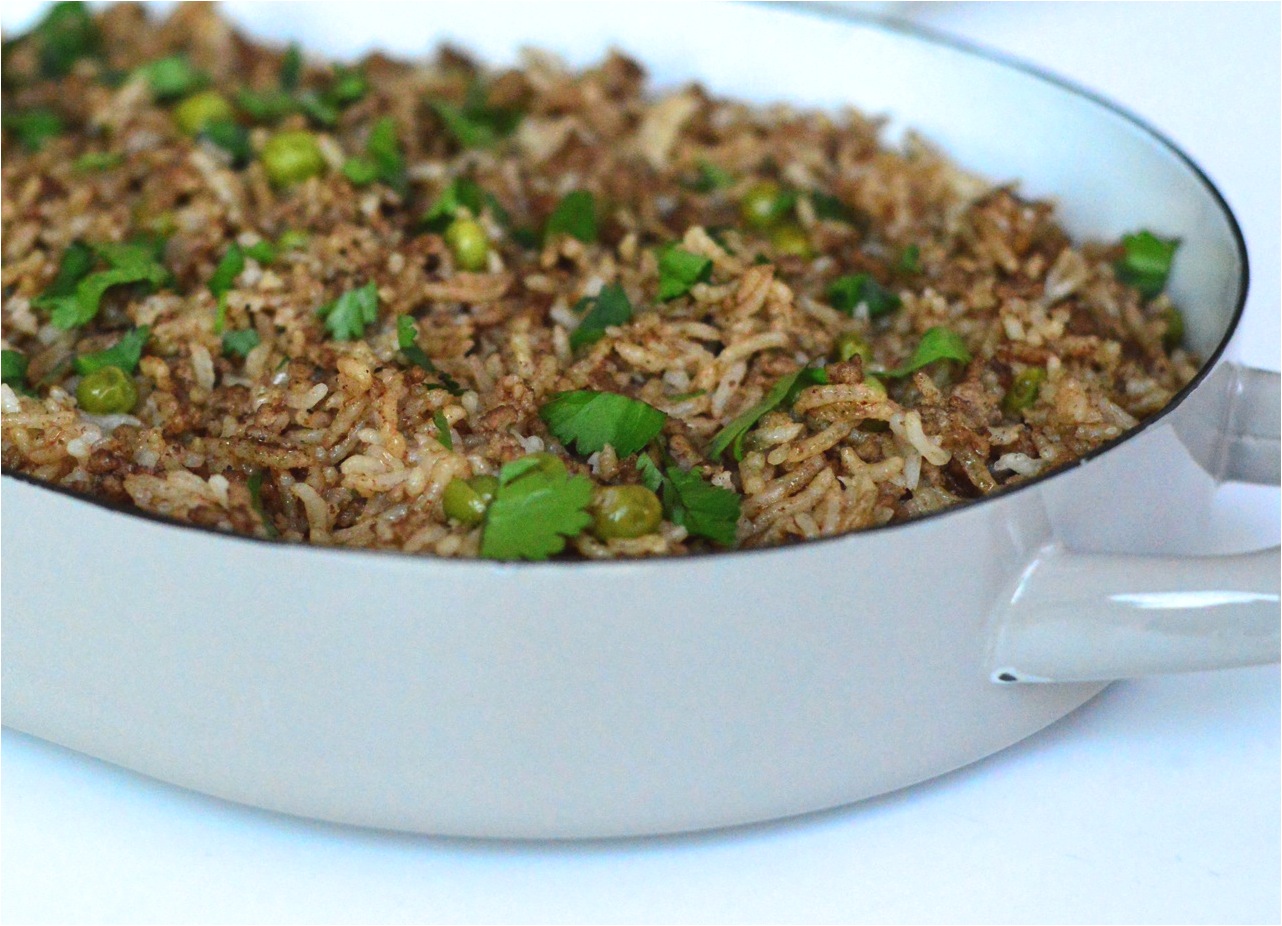
Even though Anya is a fussy eater, I’ve slowly been introducing her to new flavours and tastes and today I wanted to share my version of this delicious spiced Lebanese rice with mince lamb recipe. This recipe has lots of spices which are exactly what gives this rice dish so much flavour but these spices are in no way spicy. What’s more, this Lebanese rice is a one pot meal making it a convenient and quick mid-week meal without compromising on flavour.
Spiced Lebanese rice with minced lamb recipe:
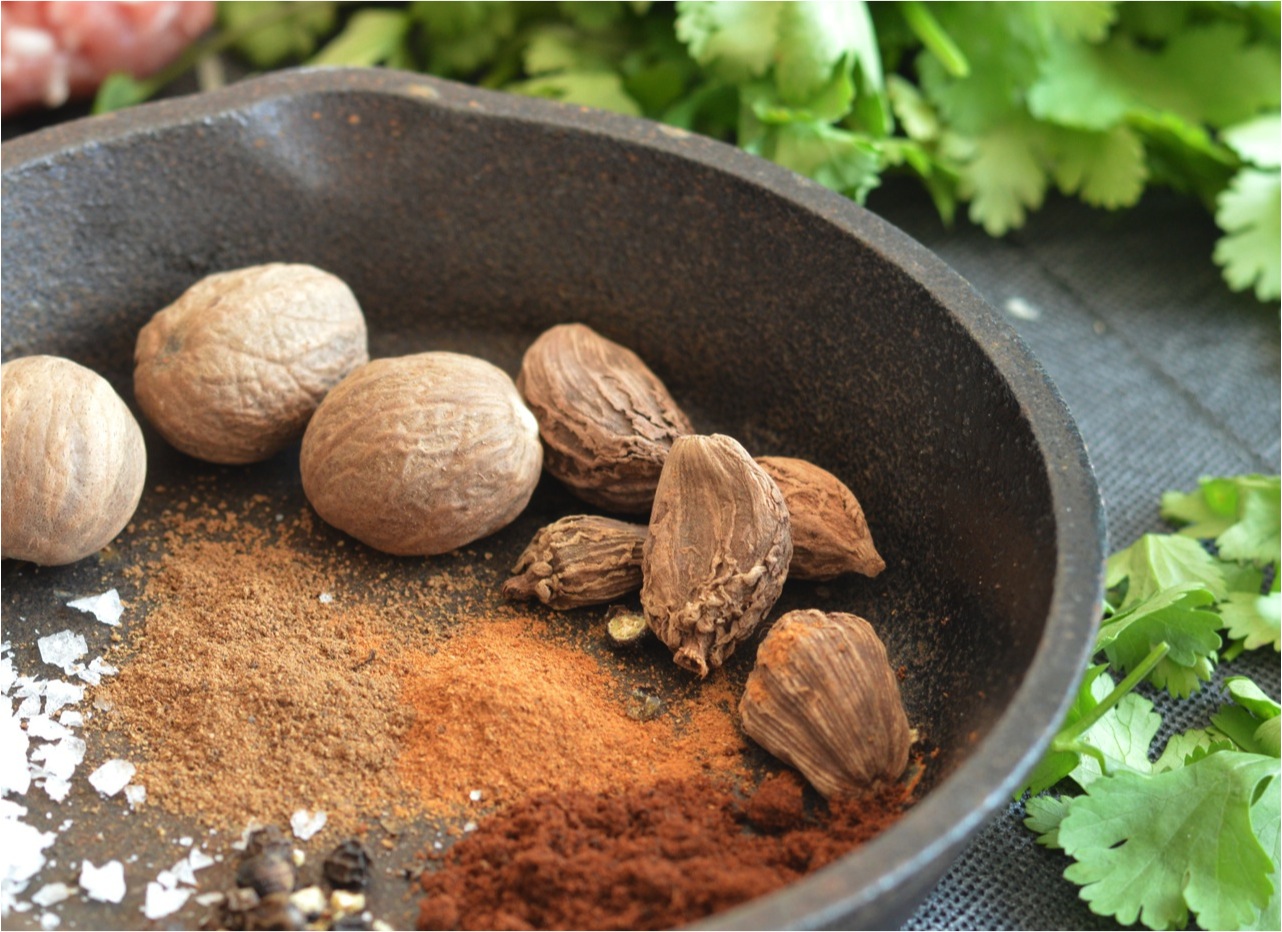
Serves: 4 Ingredients: 500 gms minced lamb (I prefer 10% fat but up to 20% is fine) basmati rice* 1 medium onion ¾ tsp all spice ½ tsp ground cinnamon 2 black cardamom pods (or ½ tsp ground cardamom) ¼ tsp ground nutmeg ¼ tsp ground clove ¼ tsp ground cumin beef or chicken stock 1 tbs olive oil large knob of butter couple of handfuls of frozen peas handful of coriander (optional) *I measure my rice in a measuring jug so I know exactly how much liquid to add. I put in rice up to the 300ml mark and then I put in a little over double the amount of water/stock – around 700-750ml.
Start by finely chopping the onion. Then measure out your spices and keep them aside.
Next heat the olive oil in a fairly deep pan and add the chopped onions. Stir the onions until they soften and turn a very light brown. Add in the minced lamb to brown making sure that any clumps of meat are broken down. (These steps can be done a few hours in advance so I usually do this in the afternoon making the dish even quicker to put together at dinner time.)
If you’ve browned the lamb mince in advance, just heat it up first. Add the knob of butter and once melted throw in all your spices and really mix it well so that they are spread through the lamb. Add the rice and peas and give it all another very good mix. Add your hot stock, bring to the boil and let it all boil for a minute or two, turn down heat to low, cover and simmer for around 20 minutes. Keep an eye on the rice as it’s done once the water has all evaporated. But make sure all the water has gone and it’s dry – if the rice is even a little wet it will be soggy and not as enjoyable. Often the rice at the bottom of the pan will burn a bit which makes that rice go crispy – this is the best bit of the dish so don’t throw it away, eat it!
I like to garnish with chopped coriander but that’s not essential. I usually have this with a simple red onion salad. Just thinly sliced red onions, sliced cucumbers and chopped coriander mixed together with a bit of salt, pepper and a ¾ teaspoon of vinegar.
This spiced Lebanese rice with mince lamb is a yummy little dish. If you give it a go, it may just become a weekly favourite as it’s become in our home. And the best bit is that not only is it a quick mid-week family dinner to put together, but you also have everything in one pot. This quantity comfortably feeds the three of us leaving a good amount leftover and this rice dish tastes even more delicious the next day.
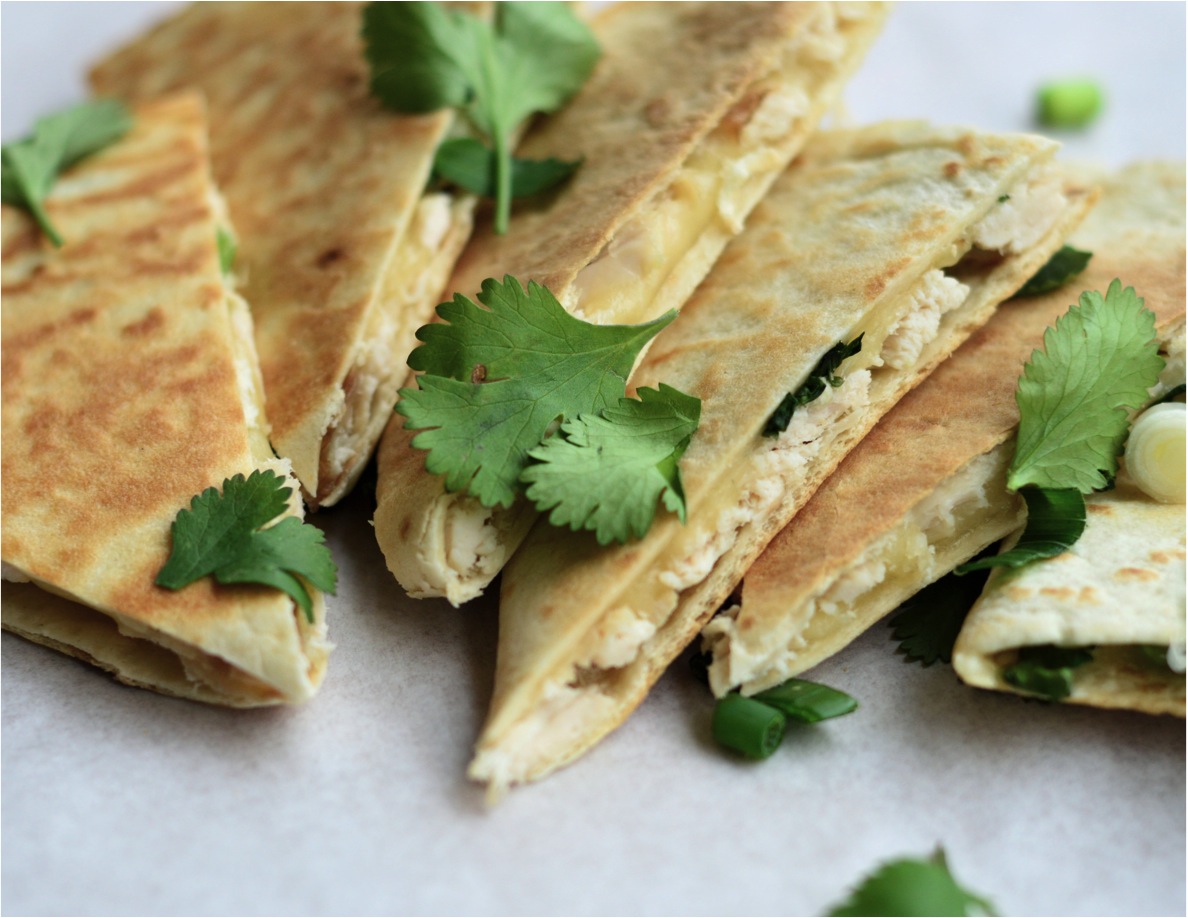
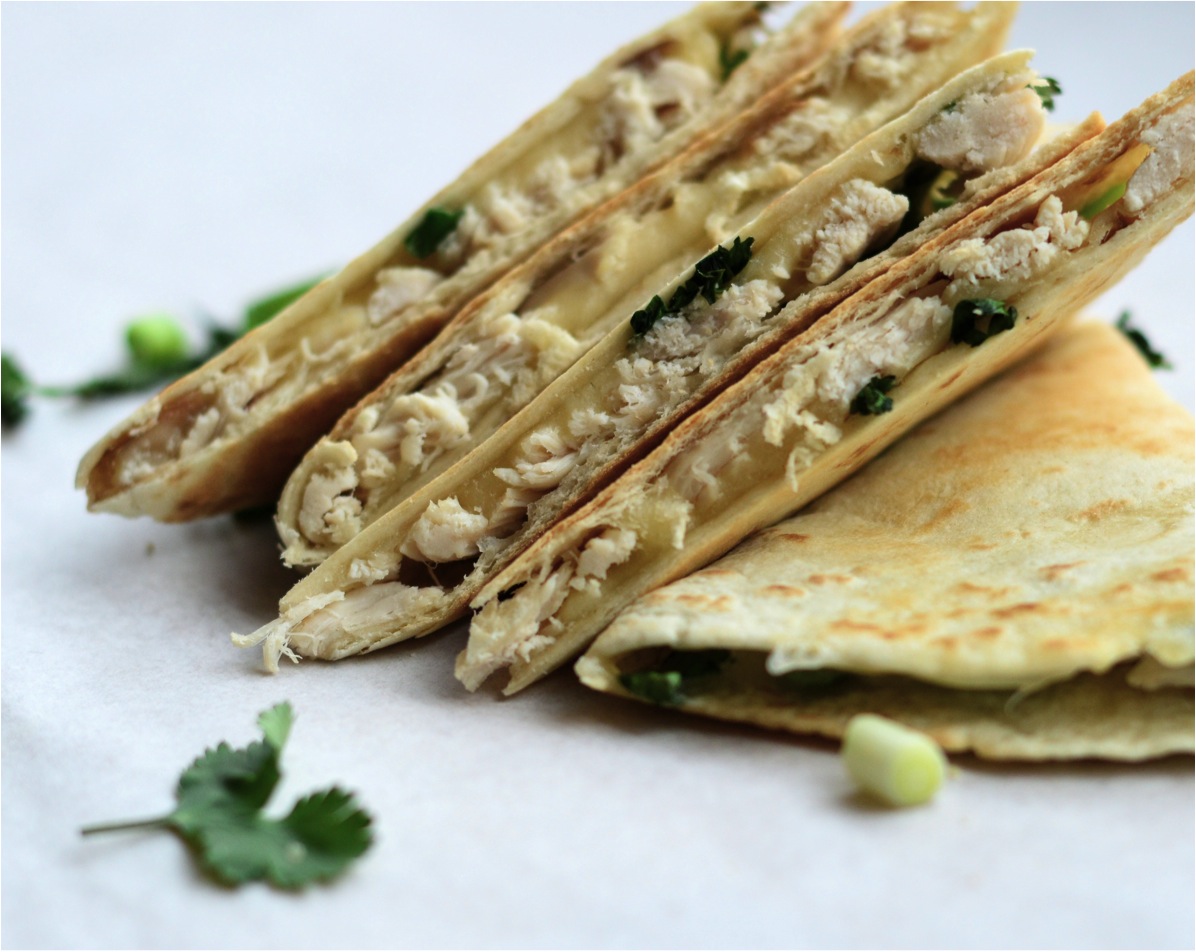
Since December we have been living with very limited kitchen facilities – a hob, no oven, barely any kitchen space and barely any cooking equipment. On top of that, the area where the make-shift kitchen was is freezing as it wasn’t heated. We have now begun renovations on our new home so I can’t wait till be have a brand-spanking new kitchen. But these last couple of months have been a challenge. Takeaways aren’t really our thing – I just think they taste nowhere near as good as fresh, home-cooked meals. So I’ve been trying to think of meals that are very quick to make on a hob but are still fresh and healthy. Eggs have been a lifesaver and as much as I adore them, I still want variety. And that’s where these delicious quesadillas have saved the day!
From play date food to after school snacks to a fast but fresh family dinner, quesadillas are quick, easy and so versatile. You can eat them three days running but with completely different fillings and you feel like you’re having a different meal each day. The tortilla wraps are handy to keep in the store cupboard and when you don’t have time to cook or just don’t feel like it, you can whip up a meal in minutes. The filling can be absolutely anything you have lying in the fridge already or anything you fancy. And these can be made ahead and just heated gently in the oven.
I made these the other day when I had some roast chicken around (which I had bought as without an oven, roasting a chicken is difficult!) so I went for chicken and cheese quesadillas Here’s what I used:
Flour tortillas Shredded roast chicken Grated cheese (I used emmental but have used cheddar and gruyere before) Finely sliced spring onions Handfuls of coriander Finely sliced small green chilli Salt and pepper to taste Butter or oil
To make, simply take a tortilla and fill one half of it with your filling and then fold over the other half. It’s much easier to make these by filling half a tortilla and folding over. Heat a pan over a medium heat and melt a tiny drop of butter. Use very little butter to make sure they get crisp – too much and the tortillas will go soggy. Place the filled tortilla in the pan and cook on each side for 2-3 minutes. Remove, slice in to wedges and dinner is ready! It couldn’t be simpler. (For my kids version, I only put in chicken and cheese as not all kids like coriander and onions and of course no kid likes chillies).Such an easy dinner that really takes so little effort.
Some more filling ideas: I always like to use a bit of cheese as it helps keep all the filling together but apart from that, anything goes. Ham, mushrooms, re-fried beans, mozzarella, pesto, peppers, tomatoes, tuna, left over roasts, chorizo, bacon, broccoli, sweetcorn, prawns, guacamole, spinach and so much more. I’ve spoken savoury fillings as this is meant to be a quick and easy family dinner but for a bit of an indulgence I am planning to try a sweet version soon – maybe chocolate spread or peanut butter and fruit. Sounds yum!
It’s been a while since I did my last Friday Finds post so I thought today I would share some sweetness from around the web. To start with I’m loving this adorable new collection of Scandinavian interiors for kids and adults too.
How many of these crazy things have you done as a parent?
A few weeks ago we went strawberry picking. We had such fun and of course ended up coming back with a ton of strawberries. A few days later I had some friends and their kids coming over for dinner so dessert had to be strawberries and cream. Not only did I have the strawberries, I also wanted a very quick and easy dessert as I was short on time. But even with quick and easy, I wanted it to look nice and not just serve it as a bowl of strawberries and cream. So I decided to involve some meringues and some madeleines to dress up the dessert.
These ones were mini shop bought meringues topped with whipped double cream and chopped strawberries. No added sugar here as meringues are so sweet. It took me seconds to put together but still looks pretty.
With these ones I bought some delicious madaleines and layered these with the strawberries and cream, topped with a dusting of crushed meringue to add some crunch. I also chopped the strawberries and left them in a bowl with a little bit of sugar so their juices would run. I used these juices to keep the dessert moist, especially the madeleines. You can use strawberry liquor too but I had made these especially for the kids.
It’s not always possible to make desserts from scratch so I’m totally in to using shop bought stuff and putting my own touch on it. These strawberries and cream went down a treat with both the kids and adults and my friends even commented on how lovely they looked. What are your favourite short-cut desserts?
Ebabee Likes is a style guide for babies, kids, teens and their mamas. It’s all about inspiration, ideas and indulging yourself and your brood. It’s written by me ~ Nomita ~ a style loving girl from Mumbai who now live’s in London. Read More...