how to organise your digital photos

It’s Wednesday and that means the next dose of my photo series.  We live in a time where taking photos could not be easier.  We click away several times a day creating thousands of memories on our phones, cameras and other devices.  On the one hand it’s quite amazing that we can photograph anything, anytime, all the time but on the other, what do you do with all those photo’s?  Do you have thousands of memories sitting in one big horrible mess on your phone, on your laptop or even on your facebook?  Do you spend hours trying to find photos?  Do you wonder what to do with all those thousands of photo’s you’ve taken?  If your answer is yes, then todays photography article on how to organise your digital photos will help you get on top of this mess.  These tips are easy to follow and with a little effort you will have a very organised photo library.  I’ve put these tips together based on what I do (when I’m organised!):

1. Download those photos
This is the easy bit because if you’re anything like me, I can’t wait to see the photo’s I’ve taken after an event or holiday.  So whenever I take photos I always download them usually on the same day or within a day or two.  Never leave photo’s on your memory card as your card will eventually get full and you may not have room the next time you need to take photo’s.  This could leave you furiously trying to scroll through your camera and deleting photo’s in a hurry to free up some space.  And besides it’s also possible to accidently delete your entire memory card.

2.  Delete, delete, delete!
As soon as you download your photos, start deleting.  And be ruthless.  Blurry shots, duplicate shots, random photos – you know the ones I mean.  And then delete some more.  Only keep the shots you really love and often you’ll find that more than half can be deleted.  This also helps keep more storage space free.  My best advice (which I try to follow) is to delete photo’s as soon as you download them.  This will make putting them in to folders a much easier job.

3.  Create folders
That brings me on to the next point – creating folders.  It doesn’t matter what software you use or even if the photos are stored directly on your PC but creating a folder system is essential to getting your photos organised.  The simplest way to do this is chronologically –  by year, then month, then by the subject or occasion.  The best way to stay on top of your system is to place photo’s in to folders as you download and after a while this will become a habit.   But if this isn’t possible you can also set aside a little time the end of each month and spend an an hour or two dividing the photos for that month in to folders.  If you do this regularly, imagine how organised your photos will be and how easy they will be to find!

None of us have photo’s just on our camera’s anymore.  In fact many of us have more photo’s on our phones than anywhere else.  We definitely don’t want to forget these so do the same with these – download to your computer (or wherever you store your photos) monthly or weekly (depending on how many you take), delete unwanted ones and put in to folders with the rest of that months photo’s.

4.  Mark your favourites
I’ve recently started flagging my favourite photos in each set of photos that I download.  This is easily doable in many photo management tools like apple iphoto or windows live photo gallery.  This has helped me so much especially when I take photo’s for my blog.  Before I’d trawl through 100 or more photo’s to choose the best two or three and then forget which ones I liked so I’d keep going back and forth and wasting far too much time.  Now when I download them, I immediately delete the hopeless ones and flag the best.  This will also help a lot if later you decide you want to print some or make a photobook – no more spending hours choosing.

5.  Storage
If you take a lot of photo’s then keeping these on your laptop can start eating away at your computers storage.  So instead you could use an external photo storage site like flickr.  There are many such sites that are free to use so it’s just a question of finding the right one for you – here’s a list that will help.

6. Print them!
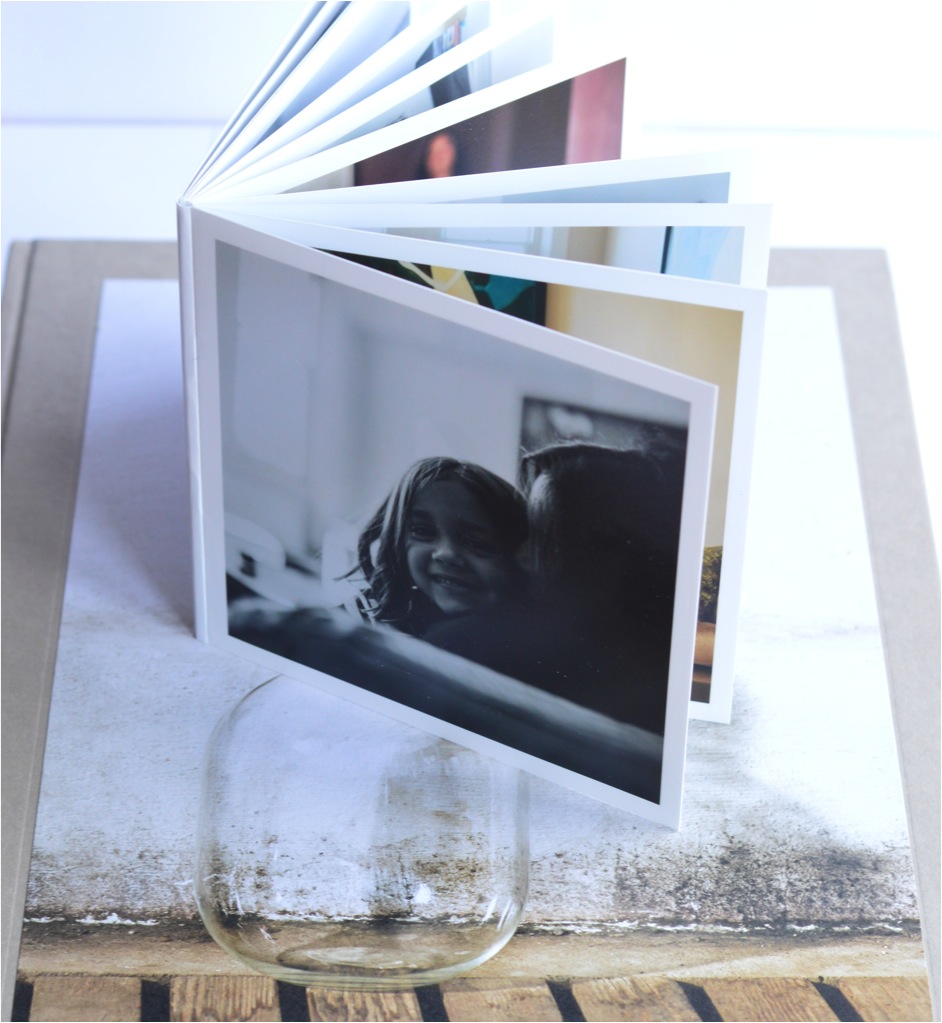
Seriously, how often do you print your photo’s?  I am really bad at this but since starting this photography series I’ve realised that there is no point learning to take fab photos only to have them sitting on a hard drive somewhere.  It’s so much nicer to hold a book or album and flick through the pages than it is to stare at a screen.  With all the easy printing options available, there really is no excuse not to print photos.  And once you’ve spent a bit of time organising your digital photos, choosing ones to print should be easy.

Some ideas on printing – You could print a yearly photobook.  I did this when Anya turned one showing the first year of her life and it is such a wonderful memory.  I did it again when she turned two but since have given up but plan to re-start.  Another idea is to make mini little photobooks of instagram photos or phone photo’s that can literally be done in minutes.  Yet another idea is to make real prints and create a gallery wall in your home.  You could refresh these every couple of years and older ones can go in to an album.  There are so many easy and quick ways to get real copies of your photo’s and once you start, you’ll love the physical memories you are creating and memories that can be handed down for generations to come.

7. Don’t feel overwhelmed
If you have done nothing to organise your photo’s over the years and have thousands upon thousands stored on your laptop and phone, don’t panic!  It’s so easy to feel overwhelmed and not know where to start.  You can either start with your latest photos and work backwards or the other way around but most importantly, start with bite sized chunks.  So consider tackling a months worth of photo’s each week and slowly you will start to see your digital photo library looking very organised.

8. Back it up
You knew this was coming, you know you should do it but are you doing it?  Even if you end up doing nothing else to organise your digital photos, at the very least you need to back them up.  I use an external hard drive that I plug in to my laptop around once a month and job done!  But there are so many ways to create back-ups, the important thing is to do it – not say you will do it, not plan to do it but do it today! Here is a simple article that lists some photo back-up options.

So that’s how I like to keep my photo’s organised.  It’s a shame to have so many gorgeous memories lying in a huge mess somewhere.  With my tips on how to organise your digital photos and a little consistent effort, you will have the most organised photo library ever.  And once you get in the habit of doing this, you will save so much time because you won’t ever have to look through thousands of pics to find the one you want.  And don’t forget to print and back-up those amazing memories.

There are lots more handy tips and ideas on photography in my previous articles which you’ll find here:
How to grow your instagram following
How to photograph moving kids
The best photo filter apps
How to photograph kids using an iphone only
A mini photobook

grey room decor ideas kids

Recently I’ve noticed more and more grey bedrooms for kids and I’m loving it.  I’ve always been a fan of grey for both kids and baby rooms and when combined with lots of white and a pop of colour, it can look quite stunning for boy or girl or even unisex shared rooms.  It’s a colour scheme you won’t tire of and you can always add in more of any colour to brighten or change the room if you want to.  For Anya’s new room I had decided to go black and white with hints of pink but now after coming across so many beautiful grey kids rooms, I’m torn.   These rooms have really inspired me and so I thought I would share a few favourites as they may just inspire you too:

pink and grey girls bedroom ideas

This is one of the prettiest grey bedrooms I’ve come across recently.  There are lots of different shades of grey in this room but using so much grey just makes the other colours and decorations really stand out.  The little hints of pink, the white and the pastel touches all come to life against this sea of grey.

grey boys bedroom ideas

From a girly grey room to a more boyish grey room – grey works so well for both sexes and any age.  Here the shades of grey used are much darker and are complimented with even more grey decorations.  Paired with lots of white this room is very cool for a boy and makes such a nice change from blue!

grey bedroom decor ideas

This mostly white shared kids room uses grey in moderation.  I like the soft, fresh vibe of this room and I love how you could practically add any colour in to this room to add a pop of brightness if you wanted.  This is a unisex room that kids won’t outgrow quickly and will be very easy to update in years to come.  Simple and sweet.

grey kids room ideas

Grey works just as well in large doses as in small doses like this quirky girls room shows.  There’s no hiding from the grey here with completely grey walls and floors.  Some may find this a bit dark but I think its an enchanting and imaginative room.  And the bright pink as well as the unexpected touch of turquoise balance the grey really well. 

grey baby nursery ideas

If I ever have to do up a nursery or advise anyone in future, grey would be my first choice.  If you don’t know what you’re having, there is no better choice than gorgeous grey and you can always add colour accents once the baby arrives.  Grey is a calming colour even when using lots of it as this grey baby nursery shows.

colourful kids room

Most of the rooms above have used lots of grey with a hint of other colours but this room shows that you can easily add as much colour  as you want in to a grey room.  This girls room has all grey walls and some grey decor mixed with the brightest accessories and it looks so fun.  Grey doesn’t mean no colour – it just means as much or as little as you want and any colour you want.  Here we’ve got bright pink, yellow, turquoise and more and it all comes together so well.

If you ever thought grey was boring, I hope you’ve changed your mind.  It’s a timeless, ageless shade that can be combined with as much or as little colour as you like.  There are so many shades of grey to play with and so many ways to use grey in a kids rooms – from hints of grey to lots of grey.  Now back to my dilema – go with grey for Anya’s new room or to stick to the original plan of black and white.  What would you do?

best sunscreen for the face

With the recent sunny spell we’ve been enjoying, it’s time to think sun screens and sun creams.  I recently came across Kiehl’s Ultra Light Daily UV Defense cream and I love it so much that I thought I would share it here.  I’ve always said that while I’m no beauty product junkie, if I come across something fab, time saving or useful for us mums then I would let you know about it.

We all know that sunscreens shouldn’t only be used on sunny days but should be used everyday of the year, at least on our faces.  They are the best thing you can do to protect your skin from the elements and protect against premature aging but I have to say that I have been guilty of using it only in the warmer months even though I know otherwise.  The only reason was that all the face sunscreens I had previously used were heavy, greasy and so, so sticky.  Also they always left white streaks and I ended up with sticky hands too after applying it.  And with this heavy, sticky texture it wasn’t the ideal base for make-up.  But now that I’ve discovered this Kiehl’s ultra light cream all those problems are no more.  This cream is indeed very light but amazingly still has a very high SPF of 50, it is not even slightly sticky or greasy and there is not a white streak in sight.  It literally glides on to your skin and it lightly moisturises while protecting from sun damage.  And putting on make-up over it is no problem either.  It’s not the cheapest cream around but a little goes a long way and I have not found anything else that comes close in texture with such a high SPF too.  So I will happily say that this is the best sunscreen for the face that I have ever come across.

This Kiehl’s sunscreen is suitable for all skin types including sensitive skin so anybody can use it.  Now that I’ve discovered it, I can’t do without it – a quick application of this cream followed by some light make-up and I’m ready to face the day.  And I know with this cream I will use it to protect my face everyday – come rain or shine!  Do you have a favourite face sunscreen?  Do let me know in the comments.

The fruitiest cards!

April 16, 2015

unusual greeting cardsIn the UK, sending greeting cards is a big deal.  People give a lot of cards for birthdays, new homes, thank you’s, new jobs, in sympathy, new baby – everything and anything.  In fact you can get a card for practically any occasion.   This whole card culture was new to me as in India we tend to use the phone much more than send cards.  But having lived here for 15 years I’ve got used to it and I love finding fun and unusual cards.  Often for family birthdays, I’ve been known to spend longer searching for the card than for the present.  So now, when I come across a card I like, I buy it even if I don’t know who the recipient is yet.  I always find a use for it and my latest finds are these absolutely adorable fruit and veg cards.  How cute are they?  I love them for both kids and adults and especially love the apple, carrot and cherry ones.  I can’t wait to get some of these unusual and very fun cards and start sending them to friends and family. 

how to grow your instagram following

It’s Wednesday and after a short break last week, I am back to my photography series.  In the past few weeks I’ve shared some great tips and tricks on how to photograph your kids, which apps will make your photos shine and so much more.  Today we are talking Instagram – the photo sharing app that seems to be all our addictions!  When done right, Instagram is the online place to build a community by sharing snippets of your everyday life so we’ve got some great tips on exactly how to do this and how to do it better.  Whether you’re a blogger, a small business owner or just someone who wants to share your photo’s for fun, these tips by super talented photographer and blogger Lucy of Capture by Lucy will be very helpful to you.  Lucy’s tips will not only show you how to grow your Instagram following but also how exactly to use Instagram to get the most out of it for you and for your followers.

I’ve had the pleasure of meeting Lucy once but have also been a long time follower of her happy and incredibly engaging photography.  Lucy has a way of putting the ‘extra’ in to ordinary every single time she takes a photo.  By her own admission she loves her Instagram space and it shows.  Her instagram feed is the story of her everyday life which is bursting with inspiration, colour, cheer and joy.  You can’t help but want to be a part of it and I know I can’t wait to see more from her each day.  I’m so delighted to have her here today to share exactly how she does this and how you can do it too so over to Lucy now!

Thank you so much for having me Nomita;  it’s such a pleasure to share how I have grown my following on Instagram since I joined just over a year ago.  I am a total Instagram addict!  I love the community spirit, the inspiration and the fact that it’s so easy to join in.  Everyday I can’t believe so many people follow my ‘mini blog’.  It’s my fastest growing social media channel by a clear mile and I see my gallery as a way to share everyday moments that help my followers get to know me better, where I can let my creative side go wild and where I enjoy practicing my styling and composition.  So I am really excited to be here today and to share my top 8 tips on how to grow your Instagram following:

how to take instagram photos

1. Be yourself
Being authentic is key.  If you aren’t a fan of staged or styled photography, no problem!  Share the photo’s of what you love to photograph because it’s hard to keep up something you aren’t passionate about.  I’m all about colour and although I sometimes try a more minimalist style, it’s really not me.  I love sharing a mix of everyday life, our home and vignettes.  A vignette is a styled photo so I am often found with a sheet of scrap paper or wallpaper, arranging a few flowers and props to create a still life image. I find it so therapeutic to share lovely photos and even if it’s pouring with rain and my boys are arguing, I can take two minutes out to create something beautiful.

2.  Embrace the community
Instagram is a wonderfully positive platform.  I have experienced nothing but great community spirit and encouragement.  I love the interaction, the way replying to comments is so easy and the engagement between my followers just amazes me.  It’s a way to be part of a community and to create a community.  Do join in with collaborative hashtags – it’s a great way to find other accounts with similar interests.  I host the hashtag #capturingcolour where each Monday morning I announce a new theme for the week and then I share my favourite picks on my blog.  I love to take part in various themes including “competition” themes just for the fun of it and also to be involved in the Instagram community.

My favourites are:
Monday – #mymondaymoodboard
Tuesday – #gatheredstyle
Wednesday – #itsamoodywednesday
Thursday – #byarrangement
Friday – #floralfridaycompetition and #fridayfaffingcompetition
Weekend – #frommykitchencompetition
Weekly and monthly themes – #natureinthehome, #stylingtheseasons, #lovelysquares, #nothingisordinary, #at_diff, #its_my_week
Family themes – #jj_its_kids, #mom_hub, #kids_of_our_world

3.  Be consistent
I like sharing lots of photos but I know it can easily overwhelm my followers and I begin to see people unfollow if I blast them with too many photos.  You don’t have to share a photo everyday but being consistent and having a regular presence is key to growing any social media platform.  Some people check their Instagram feed throughout the day while others may only check it once a day or less – so either way if you post a number of photos in quick succession, you are likely to take over someones news feed!

how to take great instagram photos

4. Be selective
Instagram is all about sharing snippets.  While on facebook you may well share 100 photo’s of your recent holiday, Instagram is more about moments that tell a story.  Give people a reason to follow your account on Instagram – keep it interesting!  I often follow the same bloggers on every platform, but find it frustrating when they share the same photo across all their accounts and then a few days later it appears on their blog too.  By that point I might have seen the same photo 4 or 5 times, and I am less likely to engage with it.

This doesn’t mean putting pressure on yourself to think of different images for each social media platform, it’s more about what you choose to share.  So for example – if we are at a play park I might share a photo of my boys to Facebook (where people are more interested and respond to family photos) and a picture of the trees or a close up shot of a little detail to my Instagram account.  Twitter on the other hand is a very fast moving medium so I often share my Instagram photos on there too.

When you are being selective about the photos you share, you want to share your best.  I recently wrote this post on Real life vs. Insta life to show that even in the midst of a normal chaotic family life you can still create beautiful photos.

5.  It is not cheating to edit your photos
There is nothing wrong at all with editing your phone photos for your Instagram account.  99% of the photos I share are from my iPhone and occasionally I will share a photo from my Canon DSLR.  But I always tweak my phone photos so they are the best quality they can be.  People often comment on how bright and light our house is but in fact we live in a 300 year old cottage farmhouse with low ceilings and small windows!  So in comes one of my absolute favourite apps – PicTapGo.  I often use their ‘lights on’ filter to help brighten my images but I steer clear of the heavy traditional Instagram filters which distort the colours and saturate the image because it’s just not in keeping with my style.  But Instagram does have a sharpening tool which can really improve those evening shots that look a little grainy and the tilt shift tool is wonderful for giving you a sharp focus point and a lovely blurry background emulating the Aperture settings on a DSLR.  So do experiment with those editing tools to improve your photos and make them the best they can be.

Remember that Instagram is a square configuration so use the square setting on your phone camera to compose your images.  I prefer to fill the whole frame instead of posting landscape or portrait images. Taking a little extra time to compose your images, thinking of things like what’s in the background that might distract from the subject can make a big difference.

instagram tips and tutorials

6.  Make it easy to find your account
It’s no good sharing lots of lovely photos if people can’t find you.  Make sure your account name or handle is consistent with your other account names on your site, blog or twitter for example.  Do share a link to your Instagram account on your blog and consider displaying your latest IG posts in your blog sidebar.  You can use a plug-in in your sidebar as I do, so it automatically displays your most recent IG posts.  Let your followers know you are on Instagram too – why not create a collage of your most recent images and share to your Facebook page or write a blog post about the accounts you like to follow.

7.  Connect and engage with like minded people
Instagram is a place to connect with like minded people.  You don’t have to follow everyone back and you can choose whether to make your account private or public.  If you go for a private account followers have to request your permission to view your photos so you have complete control over who sees your content if you choose to.  I have a public account because I want people to be able to quickly scroll through my gallery to see if it’s something they’d like to follow or not.

I follow a whole range of accounts that appeal to me for various reasons.  Some for their lovely family snaps, some who I have followed since before they were pregnant through to their second and third children, some for styling inspiration, some for food photos, some for travel.  They all engage me in different ways and no matter what the time of day is, whenever I check my newsfeed there are always lots of new photos to admire.  And I tell them so.   If you like something, if something makes you smile or if someone needs some words of support, don’t be shy – leave a comment and engage with people.  It’s a wonderful community to be part of and I have actually made some real life friendships with people I have met through following each others accounts.

taking better instagram photos8.  Have fun!
Remember the most important thing is to have fun.  If you don’t feel like posting, don’t post.  The worst thing with any social media is when it feels like hard work.  And also when it’s forced, it shows to your followers as well.  Find what you love photographing and share that.

Thank you Lucy for these fabulous tips on how to grow your Instagram following and also for sharing in such detail exactly how you do it.  I have recently gotten more in to Instagram but I definitely needed some help and these tips couldn’t be more useful.  I love how Lucy depicts everyday life but in such an inspirational and uplifting way.  Its inspired me to do better now that I know how and I am sure it has inspired you too.  Do make sure you check out Lucy’s Instagram and also her beautiful blog.  Also Lucy has kindly offered to help any of my readers with questions you may have – just find her here.

There is still more to come from my photo series but in the meantime why not check out the previous articles:

How to take great iphone photos of your kids
The best phone photo filter apps
How to photograph kids on the move
A mini photobook you can make in minutes

ways to display kids artwork

What do you do with all of your kids artworks?  Do you find it piles up so quickly that it gets out of hand?  The art in our home is produced daily which is fabulous on the one hand but on the other I really don’t know what to do with it all.  I’ve always displayed some of it by putting a few pieces on our fridge and blu-tacking others on to a wall (which kept falling off) in the kitchen and then I would change them every couple of months for newer pieces.  I save a few others in a folder and the rest go in the bin at night (naughty mama!).  But it’s impossible to keep all of your kids artwork so I think you have to be selective.

display kids artwork frame

With our new home which we are renovating from scratch I want to be more organised.  Our new fridge will be built-in so I won’t be able to display any art on it.  And besides I want to make a dedicated and permanent space for Anya’s art, not treat it like an afterthought.  So while I was hunting for ways to display kids artwork I came across these slot-in picture frames.  They are designed specially for kids art and come in a range of sizes to accommodate one or more pieces of art.  The frames themselves are very simple so they really allow the art to stand out and can also be used no matter what your decor.  I’m thinking of having an entire wall in a hallway or in the kitchen filled with these frames to make a colourful and fun gallery wall.  But what I love most about these kids art frames is how easily you can slot in new pieces of art.  No tape, no blu-tack, no constantly falling off the wall, no mess, just drop it in and change as and when you wish.  These kids artwork display frames don’t solve the problem of what to do with all the art but they are a fab idea for displaying your favourite pieces easily.

If you have some other ideas for displaying and storing kids artwork, do share in the comments.

P.S. If you want a few more ideas to get organised check out this fab entrance hall storage idea and  some ideas on how to store those soft toys.

vintage school desk ideas kids room

This week I am taking a break from my photography series but it will be back next Wednesday.  In the meantime you can look at the past photography posts as there are already lots of great hints, tips and tricks to help you take better photos and there’s even a giveaway (ending today).  Instead today I’m feeling inspired by these gorgeous vintage desk spaces for a kids room. 

I will soon be decorating Anya’s new room and I am really leaning towards a vintage desk as I think it adds bags of charm and character to a kids room.  The humble vintage desk can be mixed with any other style of furniture you have in the rest of the room – modern, retro, contemporary – whatever!   But a vintage desk doesn’t always have to mean buying an old school desk and chair.  That’s just one way to go for the vintage look but if you can’t find the right one or it’s not the right size for your space, there are other ways to create the look.  Here are six vintage desk ideas that I’m loving for any kids room:

vintage school desk ideas

If you can find the right vintage school desk and chair for your room then go for it!  It has so much charm and character and I especially love it set against black and white decor as in the room above.  It’s simple and really allows the desk and chair to shine. 

vintage white desk for girls room

A kids desk doesn’t have to be an actual vintage desk.  In case you can’t get your hands on one almost any used table will do, like  in this picture above. It’s looks like a used white table and an old, worn chair which together create a vintage feel that’s complimented with all the vintage inspired decorations – so lovely and fun.

vintage school desk ideas

If you’re going for a vintage desk look, there is no reason why you can’t totally customise your look like this seriously cool desk above.  Using vintage wood, leather belts and lots of creativity, they’ve made a very cool desk and complimented it with a vintage stool.  Also, customising your desk means that you can fit it in to any sized space you like.

 vintage desk for two kids

If your desk space needs to have room for two kids, you could of course get two mismatched vintage school desks which would look really cool or you can do something like they have done above.  Trestle style tables are all the rage at the moment so getting your hands on a vintage one probably won’t be too difficult and paired with vintage chairs, it looks great.  Lots of character, lots of charm and a nice spacious desk for two.

vintage desk with lift up lid

Remember those chunkier vintage school desks that had the lift up lids to store stuff?  They can sometimes look very heavy especially in a small room so I love what they’ve done here.  They’ve removed the legs and screwed the desk bit to the wall and paired with a vintage stool.  You still get the whole vintage desk vibe but in a modern, fresh and uncluttered way.

small space desk ideas

For just a touch of vintage, you can get a vintage chair and pair with any desk including a brand new modern one.  In the picture above, I love the simplicity of the space.  A simple shelf has been used as the desk and paired with a vintage chair all brought to life with that colour blocked wall.  This look, like many others, really can fit in with any style of decor you choose for the rest of the room.

So a vintage desk for a kids room doesn’t always have to be an old school desk.  Of course if you can find one then it’s a great option but I also love how the kids spaces above have taken the idea of vintage and made it their own.  I don’t yet know what look I’ll choose for Anya’s room but I’m feeling so inspired by all the ones above that it’s hard to pick a favourite.  Do you have a favourite?

Image credits: one | two | three | four | five | six

P.S. Have you entered my photography giveaway which is ending today?

happy easter from ebabee

Easter is here – nearly! I am so looking forward to the four day weekend (and the chocolate) even though we are and will continue to be knee deep in house renovations.  The time has come to choose all the fixtures and fittings and this is exciting but daunting too!  I want to wish you all a fun-filled Easter – enjoy the chocolate, the crafts and all the Easter fun.  In case you fancied some blog reading over the long weekend, I pulled out a range of some of my old posts which you might enjoy:

Want some Easter inspiration?
Some of the best Easter egg decorating ideas
The cutest free printable Easter cards
Fancy something sweet?  Here are some indulgent chocolate treat ideas.
Some fun Easter bunny crafts to try over the weekend.
Want somewhere to keep those mini eggs?  These printable bunny boxes should do the trick.

Want to improve your photography skills?
Learn to take some great iphone photos of your kids with these top tips
Checkout the best phone filter apps that will take your photos from ordinary to extraordinary.
Kids never sit still? Checkout this guide on how to photograph moving kids.
A quick and inexpensive way to print your instagram and phone photos plus a giveaway.

Want some easy family friendly meal ideas?
These delicious soba noodles couldn’t be easier to make.
For something a bit spicier, this Indian chicken curry is a winner.
Everybody loves pizza especially homemade pizza!

And a few more…
If this lady’s incredible story doesn’t inspire you, I don’t know what will.
How do you get your kids to tell you about their day?
Are you part of a mixed family? How do you give both cultures equal importance?
Whats the best avoiding bedtime excuse you’ve had from your kids?
Have you checked out our new Spring pieces yet?

{Anya wears bunny coat, knit skirt with attached leggings and orange wool lined boots.}

It’s Wednesday and that means it’s time for the next installment of my photography series.  Over the last three weeks I’ve shared some useful and actionable tips on photographing kids as well as some of the best photo filter apps to help turn those ordinary photos in to something special.  I’ve had some fantastic feedback on the series so far – so thank you all for that.  Today I want to talk about a really quick, easy and inexpensive way to do something with all those beautiful photo’s you’ve learned to take!  And there’s even a giveaway in today’s post so keep reading to find out more.

mini square photo book

I’m not the most organised person when it comes to printing the photos I take especially the thousands (yes thousands) of photo’s I’ve collected on my iphone.  While I love the idea of creating amazingly big and beautiful photo books, I don’t always have the time to spend compiling these.  So when I recently found out about a brand new app called Pop book, I had to try it out especially for this series.  Pop book is an app that allows you to create little mini photo books in minutes, using pics from your iphone or ipad.  I’ve made a couple of books and it literally took me a few minutes.  You can do some basic editing in the app (like cropping, adding text or borders) and then you’re good to go, all for just £4.99 delivered to your door.  The books are square, small and very cute coming in two sizes of 10×10 or 13×13 cms, each consisting of 21 photos.

instagram photo book ideas

I can think of so many reasons for making Pop Books.  Firstly, that ever growing instagram feed.  You can turn your entire feed in to a series of mini photo books.  The square format of the books is perfect for this.  The other thing that sprung to mind was my mum-in-law and other family members (especially the older generation who aren’t on facebook) that constantly ask me for photos of Anya.  Instead of emailing one photo here and there, I’m going to start sending them these cute little books every few months.  Also, because these books are small, I like the idea of having two or three perched on my desk instead of a static frame or even in my kitchen where I might put up a string and hang a load of these mini photo books.  Yet another thought I had was to have these printed after your child’s birthday party and give to the parents of the kids who came – what a great party gift and lasting memory that would make.  So many ways to use this book.

inexpensive mini photo book uk

You can do whatever you wish with these books but the absolute best part for me is the convenience of creating a book in minutes so that you have actual copies of your photos.  You never have to worry about photos being lost or deleted or wiped from your phone because you will have at least a small little hard copy.  And I also love the easiness of gifting these to family or friends.  All you need to do is download the free Pop Book app and you can start creating little photo books now.

THE GIVEAWAY:  Now the best bit – I’ve joined with Pop Book to give 5 lucky ebabee readers the chance to win one of these books.  To enter leave a comment on this post and follow my facebook page to stay in the loop.  Five lucky winners will be chosen at random.  Giveaway closes on Wednesday 8th April at midnight (UK time). Any entries after this time will not be counted.  Sorry, this giveaway is only open to UK readers.

This is my new, go to quick, easy and inexpensive solution to printing your phone or instagram photos but there will be more ideas coming on what you can do with all those beautiful photos you take.  Lots more to still come from my photo series but in the meantime why not check out the previous articles:

How to take great iphone photos of your kids
The best phone photo filter apps
How to photograph kids on the move

This post is brought to you in partnership with Pop Book.  All ideas, words and images are my own. Thank you for supporting my work with carefully selected partners that support this blog.

This giveaway is now closed. Thank you to everyone who entered. Congrats to Sarah, Stephanie, Natalie, Sam and Alice – our winners.  If you want to find out about more giveaways, follow our facebook page

free printable easter boxes

Today I have a little treat for you – these super cute free printable Easter boxes which you can fill with whatever you like.  They perfectly compliment the Easter bunny cards I shared a little while ago.

free easter treat box printable

These bunny boxes have been designed by a very talented design and architecture student called Annelies and they are exclusively for my readers.  It was her blog – A pattern a day – that first caught my attention.  The patterns she creates – wow!  Just wow.

free printables easter boxes

To make these boxes print out the templates provided.  Annelies has designed three boxes – each with a slightly different pattern.  Regular printer paper is too thin so you will need coloured card to ensure that the boxes hold together.  Once printed, cut along the outline provided and then fold down the dotted lines.  You will need to glue the the box together, leaving out the top flap so you can put things in the box.   I love a bit of pastel for Easter but of course you can choose any coloured card you like.

Easter bunny treat boxes

Anya’s been taking these bunny boxes as little gifts for the play dates she’s been invited to over the holidays.  We either fill them with little chocolate eggs or a small toy.  We’ve given out a couple and they have been loved.  Making the box yourself adds that personal touch which people so appreciate.

A big thank you to Annelies for creating these adorable free printable Easter boxes and for the cute bunny cards too.  We have made great use of these and I hope you will too. 

Here is the PDF.  Print and enjoy for your personal use:
bunnyboxes

Theme by Blogmilk   Coded by Brandi Bernoskie